Monday, October 20, 2014

Software Technology: Lecture Activities

These are the activities that we completed during lecture.


The soccer ball that we modeled was to simply get started understanding Houdini. We learned where the proper nodes were to bevel, extract, et cetera. 


With the coil, we made a tab system so that someone who is not familiar in Houdini can easily adjust the object. We added sliders to adjust the radius, height, coil density, and other attributes that anyone could possible need. 


The rocks helped us learn how to randomize multiple objects. We create 100 simple rocks then imported them into the Houdini scene. Using an expression, we created a random occurrence of rocks along a curve, including position and size.


With the cheese, we continued using the random expressions to not only create different positions along the grid, but so that each cheese has it's own unique set of holes.


Sunday, October 12, 2014

Software Technology: Dominoes

For class we did a simulation using falling dominoes. We modeled and simulated the dominoes in Houdini. Overall, the project was pretty simple and able to easily complete. It helped to learn how to simulate in a low resolution model and then bake the animation in order to switch to a high res version.

Included here is the simulation and the node editor.


Software Technology: Panther Couch

Here is a couch that I modeled in Houdini. To me, the couch does not look very comfortable, but I tried to follow the reference as closely as possible. It was the first real model that we did outside of lecture, but I'm fairly happy with the overall result.

Here are images of the couch with wireframe on and off.


Software Technology: Fence

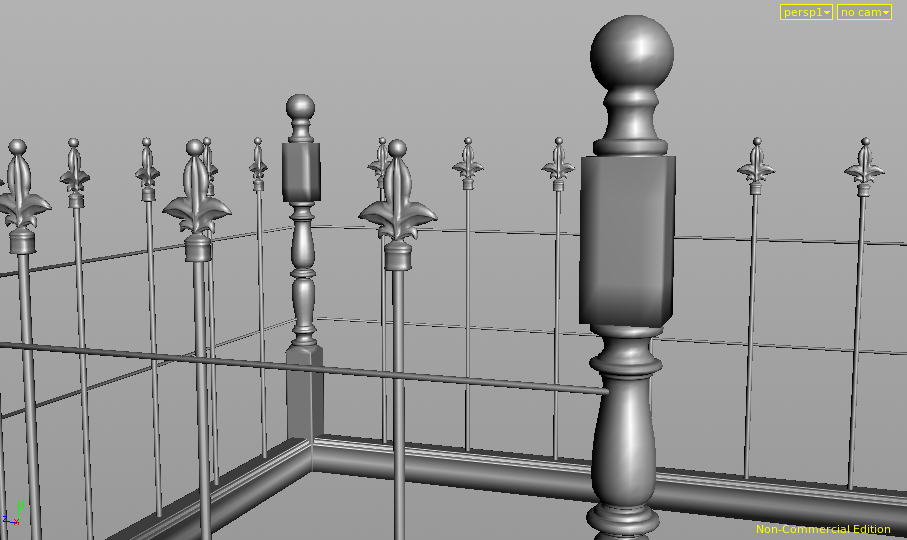
For the fence, I started in Soft Image. I modeled each piece individually in Soft Image, and then brought the pieces into Houdini. I had not run into any real issues until I tired to merge everything together at the end. For some reason, when I merged the objects, it acted as if the normals were flipped. I believe that this has something to do with the models themselves, not the process in Houdini, but I'm not entirely sure how to fix it.


Wednesday, October 1, 2014

October Classes

So this month I have Software Technology. We are supposed to be learning about programs that we haven't been exposed to so far. We should be focusing on Soft Image and Houdini. I'm a little nervous about dealing with new programs, but I'm very excited to get started!

Saturday, September 27, 2014

Character Animation 2: Lesson 2

Here is my assignment for Lesson 2. For this we used a provided sound clip in order to practice lip syncing. This was definitely not my strongest project. Some of the poses could have been pushed more, and towards the end of the clip, the character feels as if she is mumbling. It seems pretty chatty towards the end. Still, overall, I felt that I did a decent job. Critiques are welcome

Pre Production


Final Animation


Character Animation 2: Activities

Here is a compilation of some of the activities that we have done in class. Most of the activities, I had no trouble with. Of course, some of the animation could be better, as far as poses pushed and such, but overall, I am fairly happy with how these turned out. As always, critiques are welcome.

Activities included: Parent Constraint, Stop, Take, Lip Test, and Cycle


Thursday, September 25, 2014

Character Animation 2: Lesson 1

So, here is my first project for Character Animation 2. Overall this project went pretty smoothly. I didn't really run into any issues, and I'm fairly happy with the final result. I started out this assignment by drawing up some pre pro, then I blocked out the scene. After doing multiple passes with the animation, I finally finish. A couple of the poses could be pushed, but over, I'm pretty happy. Critiques are more than welcome.

Pre Production


Final Animation


Thursday, August 28, 2014

Visual Development: Lesson 4


Here is my 4th and final assignment! The left image is the unaltered one while the right is the color corrected image. All we had to do it take the final render passes into Nuke and so some color corrections. We also added a depth of field effect to the entire scene. Turns out, I actually created an Instagram scene. Ha! I wasn't quite sure where to go with this part of the assignment because I couldn't really get a feeling from the random objects in the scene. Also, it looks like something happened to the left side of the color corrected image. I wonder if a node was accidentally pushed to far to the right and I didn't notice it while in Nuke? But, I tried my best and at least it has some color correction.

Wednesday, August 27, 2014

Visual Development: Lesson 3


I'm not going to lie, the second part of assignment 2 (which is Lesson 3) kind of kicked my butt. I was having the worst time getting the caustics on my soda to work, so I ended up fighting with it. Maya won. I was going back and forth with raising the caustics, by floor being blown out, and lowering my soda color. Overall, not a fight I wanted to face. After I got my critique, I realized that one of my issues may have been that the soda was set to Thin Walled, instead of Soda. I haven't checked it yet, but I hope that that was the only issue. Also, I completely forgot to add carbonation bubbles to my soda. Oh well. Something to remember for next time. Other then that, the paint on the scraper is too reflecting and the box could you more bump value. 


Here is a close up of each item


Also, Here is the sticker that I did for the bottle. I wanted it to match the box stickers.


Visual Development: Lesson 2


Lesson 2 is finally up! It definitely took me long enough to update.  For this assignment, we laid out the UVs of a scraper and textured it. Also, we added stickers and paint marks to a cardboard box, but the base of the cardboard was already done for us. I really enjoyed this assignment. I love texturing, so I very much liked this project. Also, I got the chance to practice more digital art. Not only did I lay out the scraper texture, but I painted the stickers as well. I had fun doing it and it helped relax my mind to just sit and draw. 


Here is the texture layout

Here are the stickers


Friday, August 15, 2014

Visual Development: Lesson 1

Part 1

 Part2

Here it is! Here is my first assignment for my Visual Development Class. My Render is on the left while the reference image used is on the right. This assignment was fairly simple - just use lighting and render settings to match the reference image. Overall, I had no issues with this assignment. I had to fight Final Gathering a few times to try and get a clean render, but other then that, everything was pretty smooth sailing!

Tuesday, August 5, 2014

August Classes

So, I have attended the first lecture of both of my classes for this month. For August, I have Visual Development, which is a shading and lighting class, and Motion Capture. I have been enjoying Visual Development so far, even though I enjoy texturing more so than lighting. However, Motion Capture was a bit of a struggle the first day. I was having a hard time understanding the new software, but I did try and take lots of notes so I guess I'll have to wait until I get to lab on Thursday to try it out.

Friday, August 1, 2014

Character Animation 1: Lesson 3


So, here is my third assignment for Character Animation 1. I can say, the animation could definitely be better, but 3D animation has not proven to be my calling. Oh well. For this assignment, we were required to do a 5 step walk, a turn around, and to push the button. My walk is a little swingy. The hips seem to over rotate; however, the assignment required that our Rotation Y on the hips must be at least 35 and -35. I didn't quite agree with this, but I supposed the requirement is there in order to clearly see an over exaggeration. Also, I feel that my walk is too large. It's large in movement and makes the character appear goofy. Taking smaller steps, or adjusting the legs down can probably fix this. Still, at least my character makes it from Point A to Point B.

Animation by Hannah Epling
Scene provided

Visual Effects 1: Lesson 3


On the right is a playblast of my third assignment while on the left is a render. For this projects, were were focused on learning soft bodies. I was pretty apprehensive with this so I just stuck with the default scene. I didn't want to get ahead of myself. But, as I worked on the assignment, I found the overall project to be fairly simply. Yes, is was the scene provided, so all of the goals were set up for the soft bodies, but actually getting the movement to slow and melt the way I wanted it too wasn't as difficult as I was expecting. Overall, I'm pretty happy with how this turned out. I do suppose I could have spent more time adjusting the fluid of the flame, but the main assignment was to focus on the soft body movement. 

Visual Effects by Hannah Epling
Model of man provided